Cultivation of Psilocybe cubensis on riceflour cakes
This method page is actually a reviewed and updated mirror of the information that you can find at the original Robert McPherson website on www.fanatiscus.com
Updated later by www.mushmush.nl
Pictures made by Antoni Gandia
Introduction
The methods described here are generally known as the "PF-tek", although we made some useful adaptions here and there. The cultivation of Psilocybe cubensis on riceflour cakes is generally considered easier than cultivation on cased rye grain and is a method often employed by novice cultivators. A properly prepared and inoculated cake may produce up to 200 grams of fresh mushrooms (500 ml cake) in three flushes.
All cubensis strains can be grown on these cakes, even those that are somewhat harder to fruit on cased rye grain.
Overview
Mycelium of Psilocybe cubensis is grown on a sterilised substrate of brown riceflour, vermiculite and water. Substrate jars are prepared and subsequently sterilised in a pressure cooker. Inoculation is done by injecting spores with a syringe. After colonisation the substrate cakes are taken out of their containers and placed on wet vermiculite in a filter patch bag. After some time mushrooms form on the riceflour cakes. After the mushrooms have been picked the vermiculite is re-moistened to allow for a second and third flush.
Substrate containers
Glass jars can be used. Canning jars are the best but it may be difficult to locate them. An alternative that can be found in the supermarket is 'Bon Maman' jelly which comes in typical looking jars with a red/white blocked lid. These jars are good although a little on the small side.
Jars need to be non-tapered (no shoulders) or the colonised cake can not come out without smashing the jar.
A very suitable container is the microbox: A non-tapered polypropylene jar with a filter in the lid. These jars can be pressure cooked, are reusable and provide an excellent alternative to glass jars.
Preparation of the lid
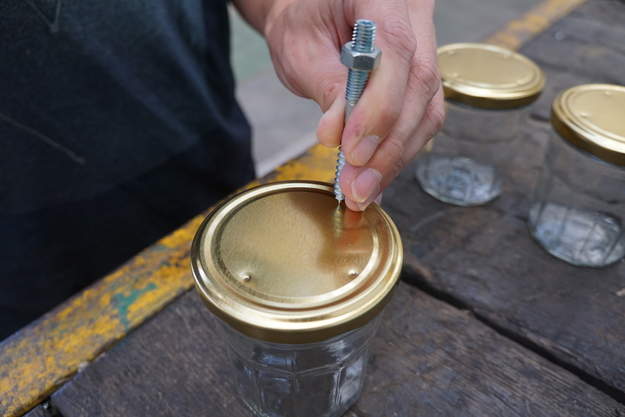
The lids will need to be fitted with 4 inoculation holes. A heated needle or pin can be used to melt holes in the lid of the microbox.
With a hammer and a small screwdriver (or similar object) holes can be punched in metal lids of glass jars. The holes are spaced evenly apart near the edge of the lid.

OPTIONAL: To prevent the entry of contaminant organisms into the jars, these holes are taped shut, only to be opened for a few seconds during inoculation. Pieces of tape are prepared by folding back one end onto itself. This makes it easier to remove them during inoculation. The pieces of tape are then placed over the holes.
Some types of tape can not be used. These will melt or lose their stickiness. Still we found that most types can be pressure cooked with reasonable success alhough they might curl up a little on the edges.
Polypropylene or nylon tape generally works fine. Masking tape can be pressure cooked but some types might harden out during sterilisation.
If suitable tape can not be found it's possible to sterilise the jars without tape and to tape the holes directly after inoculation. This however, is not recommended because of increased contamination risk.
Substrate preparation
The mycelium will be cultured on a substrate composed of brown riceflour, vermiculite and water.

Substrate recipe
•1 parts brown riceflour
•2 parts vermiculite
•1 parts water
(all by volume)
The mycelium will have difficulty growing in a substrate that does not have the correct moisture content.
First the dry ingredients are mixed. Then, while stirring, the water is slowly added.
The finished substrate should not be soggy. If too much water was added and the substrate ends up too wet, some dry vermiculite/riceflour can be added to absorb excess moisture.
Filling the jars
The jars are filled with the freshly prepared substrate. It's best to avoid having to store the substrate for longer than a few hours since bacteria will flourish in this moist, nutrient-rich medium.
The substrate is spooned loosely into the jars and compacted lightly by tapping the jars. Approximately 2 cm is left between the top of the substrate and the lid of the jar. This space is filled with a layer of dry, clean vermiculite. Since clean vermiculite does not support the growth of any competiting organisms, this layer helps to prevent the entry of contaminant organisms into the substrate during inoculation and incubation.

In the case of a microbox the lid is closed for 3/4 or left loosely on top of the jar. Microboxes should never be fully closed during sterilisation or they will implode/explode and/or deform!
Screw-type lids of glass jars are put on loosely but never screwed tight.
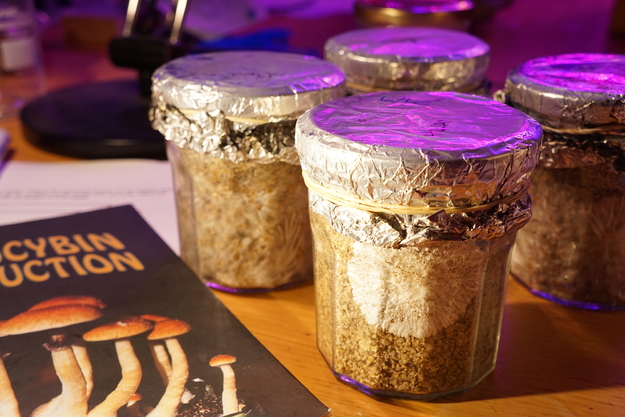
Both types of container should be covered with a double layer of aluminum foil to keep the lids in place and to prevent them (and the tapes) from getting (too) wet.
Sterilisation
Originally the PF-tek uses a sort of semi-sterilisation in a normal pot at 100° Celsius. The results of this method are unpredictable to say the least. Therefore it will not be discussed here.
The only proper way to sterilise the riceflour substrate is with a pressure cooker. For more information about pressure cooking look here.
Both types of jars are sterilised for 60 minutes at 121° Celsius. Every jar is inspected before it is put in the cooker to make sure that the lid is still on loosely, or in the case of microboxes, the lid is at least 1/4 open.
When letting the jars cool down, make sure that the lids are still on loosely. For microboxes the lids should preferably be closed completely as soon as they come out of the cooker. The jars/microboxes are left to cool in a clean spot.
Inoculation
Once the jars have cooled down completely to room temperature they can be inoculated with spores. A spore syringe (bought or self-made) is used to inject the spores into the substrate so that they can germinate and form a mycelium.
Although the risk of introducing contaminants into the substrate is pretty small because of the small inoculation holes, inoculation should preferrably take place in a clean environment. A flow cabinet is best but a glovebox or improvised inoculation hood will also reduce the amount of contamination. The table top is cleaned with alcohol or lysol and remember as always: BE CAREFUL WITH ALCOHOL AND LYSOL IN THE PRESENCE OF A OPEN FLAME!
Just for inoculation the screw-type lids should be screwed tight to prevent accidentally tipping them off. After inoculation, during incubation these lids should be loosened again. The foil is taken off and replaced after inoculation. For the microboxes the foil can be discarded after inoculation.
Any moisture that may be present on the lid is wiped off with a clean tissue.
The needle of the spore syringe is flamed until red hot then left to cool for 10-15 seconds. The needle may not touch anything or it should be flamed again.
The tape of one of the inoculation holes is peeled back and the needle is inserted through the inoculation hole, through the dry layer of vermiculite on top, aimed at the glass. 1/4 ml (or more) Is injected in the substrate. Then the needle is pulled back, the tape is replaced and the next hole is inoculated in the same way. It's not necessary to sterilise the needle after every hole but it's advisable to do this in between jars to prevent cross contamination.
The aluminum foil is replaced on the glass jars and the lid is loosened again. For microboxes the aluminum foil can be discarded.
Incubation
The cakes should be incubated in a warm, clean and dark location. Since the microboxes have an air filter they can be placed virtually anywhere. They will not suffer from air contamination even in the most dusty environments. The glass jars however do not have filter and care should be taken not to expose them to drafts.
The temperature should be between 20-30°C and the jars should be kept in the dark. Early exposure to light may lead to the formation of mushrooms while the substrate is still partly uncolonised. For this reason the jars should be disturbed as little as possible. A minute of light each day will not make them pin prematurely but an hour may.
A few days after inoculation, spots of white fluffy mycelium should be visible. These are the germinating spores. In the following days the mycelium will colonise the riceflour substrate. Often the mycelium will change from fluffy to threaded. These threads are called 'rhizomorphs' and are considered a good thing. Good fruiting cakes often showed strong rhizomorphs during colonisation.
Depending on many factors (temperature, substrate composition, mushroom strain etc.) the cakes will be colonised in 7-20 days.
Once the substrate is totally colonised by the white mushroom mycelium the jars can move to the next step. The dry layer of vermiculite on top usually does not colonise but that's ok.
Growth of any other shape or color than the white mushroom mycelium, except maybe from a little blueish tone, can be considered a contamination. Contaminated cakes should be discarded. Although many contaminants are harmles some are toxic and some can cause disease in humans. Therefore contaminated jars should be thrown out completely or they should be sterilised in a pressure cooker before being emptied out. Contaminated jars should NEVER be emptied before having been sterilised.
Fructification
Vermiculite (preferrably fine) is soaked and drained to achieve a maximum water content without leaking. A layer of 2 cm is put in a disposable tray. A colonised cake is tapped loose from the jar and placed on the wet vermiculite. The tray with the colonised cake is put in a filter patch bag which is closed on top with two paperclips.
The bag is put in a place where it receives some light (no full sun!) and where temperatures are between 20-30°C. No care is necessary from this point on until the first flush of mushrooms is picked.
The cakes will become fluffly in the next few days and the mycelium will start to grow into the wet vermiculite. The wet vermiculite supplies water to the cakes and this allows for more mushrooms without the need for dunking/soaking.
For most strains pinheads will appear after approximately a week. These are usually located on the bottom (former top) of the cake where most moisture is available. They first appear as small (<1 mm) white dots, that over the course of 1-2 days will slowly take on a mushroom shape. They will grow out to mature mushrooms in 5-7 days.
Mushrooms are picked before or just after the veil has teared. Mushrooms left to mature will sporulate and color the mushrooms black. If one desires to make sporeprints of course the mushrooms should be left to mature.
Once the first flush is picked, the vermiculite in the tray is watered heavily with a spray bottle to replenish the lost moisture. This will allow for a second flush or, when repeated, even a third flush.
Psilocybe cubensis "Cambodia" - Home-grown cambodian psilocybin mushrooms


